
9 Biggest Mistakes You’re Making in the Gym
Print
Sure, beginners are prone to gym blunders, but what’s your excuse? Here are the 9 most common screwups that no one seems to get right.
Nothing’s more fun than chuckling at one of those YouTube highlight videos depicting the hilarious antics of someone who clearly has no idea what they’re doing in the gym. We laugh, we share, and we troll. And with smartphones as ubiquitous at the gym as a set of 40-pound dumbbells, there’s no shortage of fun.
Fortunately, the laughs always come at someone else’s expense because the rest of us are smarter than that. Or so we say. Of course, no one intentionallydoes a movement wrong, but even more experienced trainers make any number of common mistakes that not only diminish their training results but also increase the risk of injury.
This collection of nine exercises lists the most common culprits, movements disguised because many of the blunders are being made without the slightest hint that something’s amiss. Consider it your chance to fix them before someone aims their camera at you!
CHEST
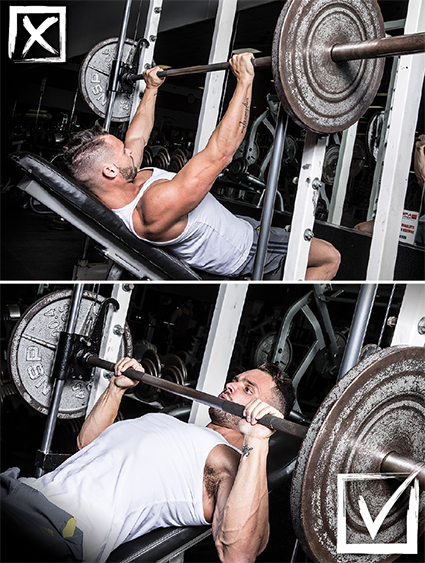
Problem: Pressing Your Cable Flyes
The Blunder:This doesn’t affect other single-joint moves for the chest such as dumbbell flyes. What’s wrong? You’re pressing the handles, just as you do with your inclines, declines, and flat-bench barbell presses. While that’s not a problem per se, why would you even consider pressing your cable crossovers in the first place? (Hint: Google “shooting a cannon out of a canoe.”)
Crossovers are by design a single-joint exercise to better isolatethe pecs, which is done toward the end of your chest workout. You can tell the slip-up by watching your elbows: If they close and open up on each rep, similar to how you do bench presses, the triceps are recruited into the movement. (When the elbow extends—essentially meaning the degree of bend closes up over the course of the positive rep—the triceps are working.) That turns this exercise into a multi-joint exercise—a press—which is clearly a fail!
The Fix:First, lighten the weight: You can’t use nearly the same weight on a single-joint exercise if you’re doing it right. Now, rather than extending your elbows (straightening your arms) during the movement and then bending them on the return, instead lock them in about a 135-degree angle (halfway between 90 degrees and one in which your arms are perfectly straight). Hold this arm position for the durationof the set. If you’re unsure, watch your form in the mirror, or just move over to the pec-deck flye, which automatically locks your elbows in the correct arm position. Some say this is like hugging a large tree or barrel. What’s paramount is that there should be no change in elbow position during the entire set!
BACK
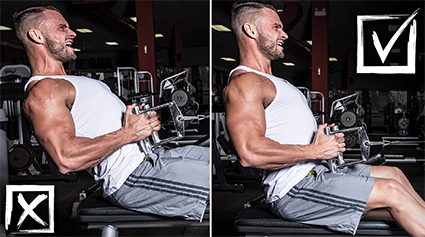
Problem: Leaning Excessively Forward and Backward as You Pull
The Blunder:Whether you’re doing pull-downs, seated rows, or any other back movement, when you go too heavy, you’re likely to generate greater body English to successfully pull a bar into your midsection. That means leaning back excessively. Here, momentum can rob muscle gains because the stimulus starts shifting to other muscles—in this case, the lower back. Effectively, you’re taking a multi-joint exercise and adding another muscle group from an altogether different joint into the equation. On back day, you commonly see trainers seesawing forward and backward at the waist, but the erectors should play no more than a stabilizing role here.
The Fix:You need to better control the motion. Maintain an upright position throughout each rep, keeping forward or backward lean to a minimum—no more than about plus or minus 10 degrees. This ensures the muscular stress remains on the upper lats and middle-back musculature.
UPPER TRAPS
Problem: Craning Your Head Downward When Shrugging
The Blunder:Just about everyone does this, and nobody’saware of it. On your heaviest sets of shrugs, it’s almost an established fact that bodybuilders will turn their heads down. And that’s a hugeproblem! When your head drops, your cervical spine rounds—and you’re literally holding a ton of weight in your hands that’s transferred right into your upper spine. Believe me (and I mean literally believe me), you magnifythe risk of a career-ending cervical disk injury, which may seem remote but isn’t. It took meyearsto recover.
Fix It:It seems almost boring for me to tell you that every exercise you do in the gym must keep your spine in a position to protect the disks. That’s why you’re always hearing to keep your back flat and never allow it to round. But rarely does one hear about protecting the cervicalarea (think neck). Yet every time you see someone doing bent-over rows, bent-over lateral raises, or deadlifts—especially Romanians—they expose the disks to huge pressure coming from just one direction, which provides minimal safety.
The neck should always be in the sameposition as the rest of your body, which means if you’re bent over 45 degrees, the direction of your head should be as well. And when you’re bending over as you execute the movement, the head must travel with your body. The point is, if you’re focused on looking back at yourself in the mirror, as too many lifters are, you’re craning your neck and making a ginormous mistake.
Although shrugs aren’t done in a bent-over position, there’s a natural tendency to turn your head down, and by now you should know that disrupts cervical spinal alignment. To focus on keeping your spine in proper alignment, always keep your chin level with the floor when shrugging. If you have a mirror, look back at yourself and be aware of tendencies to instead look downward.
As for working your upper traps most effectively, simply elevate your shoulders directly toward your ears, straight up and down. Exaggerate the lowering phase and restrict the movement to this vertical plane. This means that another form buster is rolling your shoulders. Not only is rolling your shoulders forward or backward inefficient, but that extra motion can put added stress on your neck as well. And we already know that’s a bad idea.
ROTATOR CUFFS
Problem: You’re Watching Others’ Bad Form in the Gym
The Blunder:Warming up the shoulders and rotators is a great idea before you get into heavy upper-body training, but here’s one that everyone’s getting wrong. Those standing dumbbell movements in which your elbow is locked by your side and you’re waving a dumbbell back and forth aren’t anything what you think they are! My physical therapist calls these isometric biceps curls, and yes that’s exactly how far off you really are!
The Fix:To work your rotators, the line of pull must come from acrossyour body. (Think of gravity coming from the side!) But when you’re standing, gravity is pulling the weight straight down. Essentially, if you’re using a dumbbell, you’re just holding it up in a hammer position, waving it back and forth. No shoulder warm-up in that!
To effectively target the cuffs, the line of pull must be coming from acrossyour body. Two solutions, then: Adjust a pulley to about waist height and, using the same elbow-locked-by-your-side arm position with your arm bent about 90 degrees, pull to your outside to work the external rotators, and then reverse body position and pull across your body to work the internal rotators. Go very light and do these for high reps. For those who still want to use a dumbbell, try lying on your side on a bench.
TRICEPS

Problem: Dropping Your Elbow when Doing Dumbbell Kickbacks
The Blunder:Here’s another problem exercise in which gravity is misused. Kickbacks are a common elbow-extension movement that require you remain in a bent-over position with your elbow pinned by your side throughout the motion, which most effectively isolates the triceps.All too often, you’ll see the working-side elbow drop during the motion, and some folks compound the problem by partially standing up as they do these. Gravity is therefore no longer creating tension on the triceps but on the biceps. In fact, you’re extending the elbow pushing withgravity, and if you haven’t learned the basic physics, lifting weights is about pushing against gravity. Here, what’s supposed to be the eccentric motion (stretching the triceps) now becomes the actual movement—for biceps!
You can’t be doing curls or hammer curls, which is now what this is, and expect that just by extending your arm you’re now doing a kickback. You’re not.
The Fix:Let’s revisit the bent-over position, which is where you’ll need to remain. Lockyour elbow beside your torso so that your upper arm is roughly parallel tothe floor.Hinge at the elbow,but don’t allowitto break any furtherthan about90 degrees at the bottom of the rep. (Your forearm should be pointing directly toward the floorat this point—don’t go any further than that!) Watch yourself in themirror if you’re having trouble gettingthis,as many lifters are completely unaware of their compromised form.
BICEPS
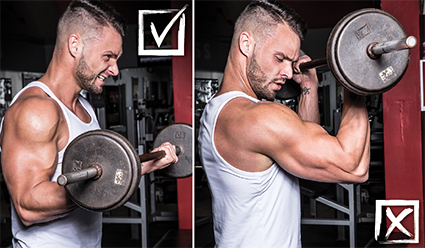
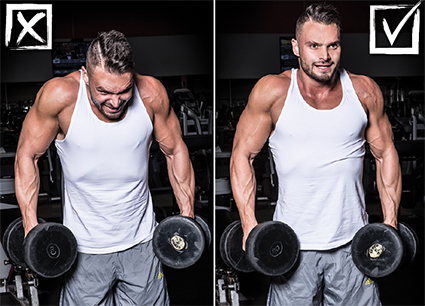
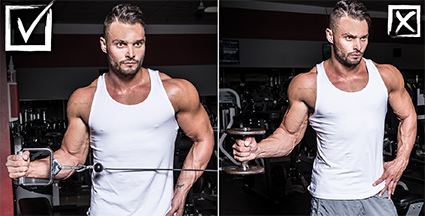
Problem: Pulling Your Elbows Forward as You Curl
The Blunder:If you see anything in common so far, it’s that folks like to find ways to make exercises easier, whether they know it or not. Here’s another that’s done with just about any biceps exercise.
Sure, we all want to raise our biceps curls as high as possible to ensure a full range of motion, but when you pull your elbows forward from their place locked by your sides, you’re now recruiting the front delts into the motion. That effectively turns a single-joint biceps exercise into a multi-joint one that no longer hits just the elbow flexors. You’ll notice that in this endpoint position, your hands are now stacked directly aboveyour elbows, meaning there’s reduced tension in this top position, a nice little resting spot, if you will. So much for your peak contraction.
The Fix:Easy enough—simply lock your elbows by your sides for the duration of the set. Stop the upward motion of each positive rep when you can no longer maintain this arm position, which, for most people, is at about shoulder level. Alternatively, shifting the movement to cables can also help because even if your hands are stacked above your elbows, the line of pull is coming from the side, so you still can’t rest at the top.
GLUTES/QUADS
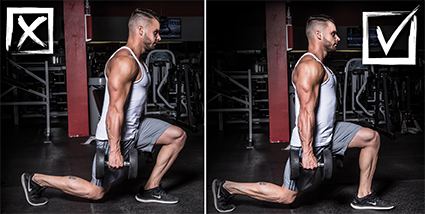
Problem: Taking a Short Step when Lunging
The Blunder:You’ve heard the back-and-forth about how your knees’ health is affected when they pass beyond an imaginary line that comes up from your toes when you lunge (or squat, for that matter). Actually, for most people in good knee health, it’s really not a problem.
But that doesn’t mean there aren’t considerable shear forces acting on the knee that are amplified when your knee passes well over your toes, a result of taking a short step (or even putting your feet very low on a leg-press of hack-squat platform).
The Fix:Even if you have perfectly fine knees now, it’s a good habit to start taking longer steps now to reduce knee stressors. What’s more, a longer step can also dial up increased hamstring and glute activity by reducing the contribution from the quads. (Less stress on knees, less stress on muscles that attach to knees.)
UPPER HAMSTRINGS/GLUTES
Problem: Mixing Up Elements of Romanians with Conventional Deadlifts
The Blunder:Yikes! Another near-universal problem and not only just among beginners! The problem arises when a trainer unknowingly integrates elements of each exercise into a hybrid movement. The result is not only far less effective but could also conceivably pose risks to spinal health. What you commonly see is a guy who bends overwith a heavy weight yet still allows the bar to make contact with the floor.
The Fix: While the Romanian (RDL) and conventional deadlift share a name, they’re very different movements. First, understand that the conventional deadlift is a multi-joint exercise in which the bar starts on the floor, while the RDL is a single-joint move in which the bar starts with you standing. With the RDL, you bend over at the hips, jutting your butt backward as the load pulls your upper body downward. Here, you should neverreach the floor—depending on flexibility, stop the movement at about shin level with the bar tightto your thighs. (If the bar strays away from your shins, it puts extra pressure on the lower back, a variation called the stiff-legged deadlift. Here, you should always go fairly light.) With RDLs, you should feel it in your upper hamstrings and glutes as you rise up. As you rise up, press your hips forward.
With the conventional deadlift, you don’t bend over but, rather, descend into a half-squat position (which makes this multi-joint), and it’s this position that allows the bar to settle on the floor (because you’re now physically closer to it). By touching the floor, you lose the elastic energy; that is, you’re coming from a dead stop. This version requires you to get your butt down lower. Because you typically use lots more weight when doing the regular deadlift compared to RDLs, it’s important you know the distinctions between the two exercises!
ALL BODY PARTS

Problem: Facing the Wrong Direction on an Angled Smith Machine
The Blunder: Who doesn’t love the versatility of the Smith machine? It allows you to do all sorts of movements without having to balance the weight, so you just have to focus on pushing as much weight as possible. That also builds in a degree of safety. What you may not have noticed is that not all Smith machines are alike. Some allow the bar to track straight up and down, while others are slightly angled. Although that seemingly makes a minuscule difference, it’s rather critical in terms of safety and effectiveness.
That’s because each exercise you do has its own movement arc. For example, with bench presses, the bar starts at nipple level and you push up and back so that your arms are straight up at the top of the movement; that is, the bar travels in a curvedline up and back over your head. Again, every exercise has its own movement arc. What you have to do is match the direction the bar is forced to travel (by limitations of the machine) with the natural movement arc of whatever exercise you’re doing. Ask yourself: Is that the sort of information you’re familiar with? You’ll need to be when using one of these angled machines because your orientation to the bar makes a huge difference.
With an up-and-down Smith machine, your body already has to make slight accommodations in body position to compensate for the locked movement pathway; that is, a movement that should be an arc is forced to travel in a line, straight up and down. But if you’re facing the wrong direction for whatever exercise you’re doing, you amplify the changes your body needs to make, and that can put you in a poor position to complete the movement. What’s more, you’re now rehearsing (and building strength in) a movement that’s unnatural, and one that may notcarry over as well to free weights.
One movement is safe and effective, and the other is counterproductive and can put your joints at greater risk because you’re pushing along an unnatural pathway.
The Fix: Clearly, how you’re oriented to the bar on an angled Smith machine is important, not just for bench presses but also inclines, overhead presses (behind the head versus in front of it, and even that makes a difference!), close-grip benches, declines, squats, lunges, drag curls, and other exercises.
Most often, you’ll approach the bar with the only consideration being that you’re facing the mirror, not the natural movement pattern of the exercise you’re about to do and which direction the machine is oriented. Seeing yourself in the mirror should be a non-factor with angled Smiths. And if you just guess which way to face, your odds are only 50-50.
If you’re unsure, find a straight up-and-down unit, or with an angled Smith, try an unloaded bar and see which direction you need to be—facing in or out—that best simulates the free-weight version.